How to Manually Clean Indexes from Elasticsearch
In a previous post we covered getting started with the ELK stack (Elasticsearch, Logstash, Kibana). Now we need to remove old indexes manually from an Elasticsearch datastore sorted by age. We’ll be using the curator tool in a sandbox using pip and virtualenv on a CentOS/EL system. Let’s get started.
Install Pip and Virtualenv Pip is to Python what CPAN is to Perl, it’s a package manager for Python.
Virtualenv is a way of installing Python libraries and running applications in a sandboxed virtual environment, similar to a system chroot. You almost always want to be using virtualenv when doing anything involving installation of Python libraries which might conflict with the ones shipped by the operating system distribution.
yum install python-pip python-virtualenv
Create a Virtualenv
Now you’re going to create a virtualenv sandbox from which to install all the necessary Python libraries via pip for running the curator.
virtualenv elk_cleanup
At this point you should see python setuptools run and complete..
New python executable in elk_cleanup/bin/python Installing Setuptools………………………. done.
Enter the Virtualenv
Now we’re going to activate our Python virtualenv, you should see your shell prompt change.
. elk_cleanup/bin/activate(elk_cleanup)[root@bullwinkle ~]#
Install Curator and Libs
Now that we’re safely inside our cozy virtualenv, install curator
pip install elasticsearch-curator
You’ll see a bunch of stuff happen – libraries and dependencies install. Namely you’ll just need elasticsearch-curator, elasticsearch, click, urllib Python modules. You might see some warnings too but that’s ok – so long as they aren’t fatal.
Downloading/unpacking elasticsearch-curator Downloading elasticsearch-curator-3.4.1.tar.gz (89kB): 89kB downloaded Running setup.py egg_info for package elasticsearch-curator Downloading/unpacking elasticsearch>=1.8.0,=3.3 (from elasticsearch-curator) Downloading click-6.2.tar.gz (281kB): 281kB downloaded Running setup.py egg_info for package click Downloading/unpacking urllib3>=1.8,=1.8.0,elasticsearch-curator) Downloading urllib3-1.14.tar.gz (161kB): 161kB downloaded Running setup.py egg_info for package urllib3 Installing collected packages: elasticsearch-curator, elasticsearch, click, urllib3 Running setup.py install for elasticsearch-curator Installing curator script to /root/elk_cleanup/bin Installing es_repo_mgr script to /root/elk_cleanup/bin Running setup.py install for elasticsearch Running setup.py install for click Running setup.py install for urllib3 Successfully installed elasticsearch-curator elasticsearch click urllib3 Cleaning up…
What’s important is the last bolded line – necessary Python packages are installed.
Run the Curator
Ensure your ELK stack is up and running, or at the last that elasticsearch is accepting API connections. Now run curator. The following example will cull anything older than 30days and assumes you’re running it from the localhost where elasticsearch resides.
Источник: https://hobo.house/2016/02/18/how-to-manually-clean-indexes-from-elasticsearch/
How to clean up ElasticSearch with Curator 4.0.6
Summary
Today, I would like to share with you a quick introduction to a tool that cleans and maintains your ElasticSearch cluster clean and free from old data: Curator (thanks flopezlasanta for the tip on this!)
This tool, along with ElasticSearch itself, evolves very quickly, so when I was looking for information on the subject and I found this blog entry from 2014, I noticed how much the way of working with the tool has changed. Anyway, kudos to @ragingcomputer!
Installation instructions
Before you install Curator, you need to get the Python package Installer (Pip), so Python is another requirement, Note that if you are running a version of Python newer than 3.4 (version 3) or 2,7 (version 2), Pip comes already installed with Python. More info here.
Note: You need to be super user to perform the installation.
And you are ready to go! Now let´s check the other two files needed to make it work.
Configuration file
This is a standard configuration file, using an ElasticSearch cluster running in you same host and in the default port. Note that you have many more configuration options for more advanced scenarios. Check this for further info on them.
Action file I don´t want to go too deep in detail, but curator allows multiples actions to be performed over your indices, among the most important are:
- Delete an index: Pretty obvious, it deletes the data.
- Close an index: This keeps the data but it is not loaded into memory.
- Open an index: If you want to look further back, you can reopen a closed index.
You can also take snapshots and restore them… Plenty of choices but, for the moment, let´s stick to the basic delete:
This is the basic delete action, that searches for indexes created by logstash (see the logstash-* search pattern) and deletes the ones older than 80 days. If you want something more advanced, there are a lot of useful examples pretty much ready to take and use here. Don´t forget to enable the actions as they come disabled by default.
Standalone execution Now you are ready to execute a one-off cleaning of your cluster. Just invoke curator referencing the configuration file and the actions file.
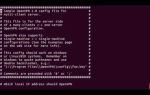
Note: If you are not too sure about the outcome of this execution, it is recommended to use the –dry-run option, which will simulate the actions taken but will not change anything in your cluster. This is an example of a simulated execution:
$ /usr/bin/curator –config /home/victor/curator.yml /home/victor/action.yml –dry-run
Action #1: delete_indices
DRY-RUN MODE. No changes will be made.
(CLOSED) indices may be shown that may not be acted on by action “delete_indices”.
DRY-RUN: delete_indices: logstash-2016.06.01 with arguments: {}
DRY-RUN: delete_indices: logstash-2016.06.02 with arguments: {}
DRY-RUN: delete_indices: logstash-2016.06.03 with arguments: {}
Action #1: completed
Job completed.
As you can see, the actions taken by Curator if it would have been enabled, would be to delete the indexes related to the days first, second and third of June 2016.
Scheduled Execution with CronTab
To make this tool even more useful, you can schedule a periodic cleanup, which should run automatically without any manual action needed. You can do this very easily with crontab.
Note: If you are running on Windows, you can use schtasks or any other planning tool. You can check the result of the cron execution by tailing this file: /var/log/cron
I hope it helps you having your ElasticSearch cluster hold only the relevant data to make it quick and useful!
Источник: http://victorferrerjava.blogspot.com/2016/08/how-to-clean-up-elasticsearch-with.html
Deleting old indices in Elasticsearch using Curator
Elasticsearch can throw disk usage exceptions like these:
[INFO ][cluster.allocation] [NodeB] low disk usage [90%] exceeded on [ NodeA] free: 5gb[10%], replicas will not be assigned to this node
[WARN ][cluster.allocation] [NodeA] high disk usage [95%] exceeded on [ myELK -Node2] free: 4.8gb[9.9%], shards will be relocated away from this node
[INFO ][cluster.allocation] [NodeA] high disk usage exceeded on one or more nodes, rerouting shards….
This can cause a drastic performance reduction of the Elasticsearch service, and finally lead to its crash.
Root Cause
A huge number of logs can be written to the Elasticsearch service periodically. If you don't have a proper archival process in place, data in the Elasticsearch cluster will grow uncontrollably, which can lead to the loss of valuable log data if you don't provide enough disk space.
Solution
Curator is a tool from Elastic (the company behind Elasticsearch) to help manage your Elasticsearch cluster. Curator is a Python-based tool that can help you manage Elasticsearch indices. Deleting old indices is one of the primary use cases for Curator.
As a prerequisite, you must install Python version 3.4+. You can then install Curator using the following pip command:
pip install elasticsearch-curator
This should install Curator in the machine.
Additional commands to get started with Curator
List the available indices in the ElasticSearch cluster
curator show indices –all-indices
Remove old indices
It is better to do a dry run before initiating an automation script to delete data. Curator provides a dry-run flag to output the verbose data from a test execution without actually deleting the indices:
curator –dry-run –host delete indices –time-unit days –older-than 60 –timestring '%Y%m%d'
Once the test runs are verified, you can automate the purging of old indices using scripts (for example using a cron job) as shown below:
curator –host delete indices –time-unit days –older-than 60 –timestring '%Y%m%d'
This will delete the indices older than 60 days.
YAML-based Curator configuration
A more elegant way to configure and automate Curator execution is using a YAML configuration. This needs 2 configuration files, namely:
- curator-config.ymlContains configuration details such as the cluster location and port settings. Sample file content is shown below:client: hosts: — localhost port: 9200 url_prefix: use_ssl: False certificate: client_cert: client_key: aws_key: aws_secret_key: aws_region: ssl_no_validate: False http_auth: timeout: 100 master_only: False
logging: loglevel: INFO logfile: logformat: default blacklist: [‘elasticsearch’] - curator-action.ymlConfigures an action list to be executed by Curator. For example, to back up and purge indices of data from logstash, with the prefix logstash, use the following configuration:
Источник: https://community.talend.com/t5/Architecture-Best-Practices-and/Deleting-old-indices-in-Elasticsearch-using-Curator/ta-p/124471
Агрегация логов log4j2 средствами ELK
Для своих ETL (Extract, Transform, Loading) процессов, на этапах E и T, то есть извлечение и преобразование данных мы используем Apache Storm, и, так как большинство ошибок, связанных с инвалидацией сырых данных, происходит именно на этом этапе, — появилось желание централизованно логировать всё это, используя ELK стэк (Elasticsearch, Logstash, Kibana).
Каким же было моё удивление, что нигде не то, что на русском языке, но даже в оригинальных туториалах не было описана работа с логами в формате log4j2, который является дефолтом в мире Java-приложений.
Исправляя это упущение — под катом туториал по настройке централизованного сбора любых log4j2 логов на основе:
- ELK внутри Docker
- Настройка log4j для работы с Logstash
- Настройка Logstash для правильной индексации логов
- Немного бонусов, в виде краткой настройки Storm и интеграции Elasticsearch с Grafana
ELK на Docker и настройка Logstash
Здесь уже писалось про установку ELK внутри Docker-контейнера, однако автор этой статьи использовал filebeat, а мне, по ряду причин, не хотелось тащить на application-хосты какой-то дополнительный софт, к тому же log4j2 умеет слать данные напрямую без смс и регистрации в TCP сокет.
Скачаем образ
После недолгих поисков, я обнаружил, что с последний версией ELK (на момент написания статьи это ELK 6.0.0) более менее из коробки работает только Docker-образ sebp/elk — его мы и используем, но исправим образ для работы без filebeat и будем использовать для этого TCP Source.
cd /usr/local/src
git clone https://github.com/spujadas/elk-docker
cd elk-docker
Создадим свою собственную конфигурацию Logstash
Просто создаем два файла — один для приёма логов по TCP, а другой для записи в Elasticsearch
[root@host01 elk-docker]# cat 02-tcp-input.conf
input { tcp { port => 5044 codec => line }
} filter { kv { source => “message” recursive => “false” add_tag => “%{loggerclass}” }
} [root@host01 elk-docker]# cat 30-output.conf
output { elasticsearch { hosts => [“localhost”] index => “storm-%{+YYYY.MM.dd}” }
}
Обратите внимание на kv filter (key value) — именно он позволит нам корректно обрабатывать логи в формате log4j2, так как мы разобьем необходимые нам параметры на пары «ключ-значение».
Параметр же recursive необходим, чтобы фильтр не пытался искать вложенные пары «ключ-значение» в поле value.
add_tag => “%{loggerclass}” — добавит к каждой записи Java-класс процесса, который породил эту запись — очень удобно, когда нужно посмотреть работу (ошибки) конкретного компонента, например на этапе отладки.
Так же на этом этапе мы можем добавить в Dockerfile установку необходимых плагинов для Elasticsearch или Kibana (для Logstash тоже, но на сколько я понял в составе образа уже установлены все официальные плагины, так что если вам понадобится что-то очень кастомное) как описано здесь.
Соберём контейнер
Для чего немного изменим Dockerfile (я приведу только diff):
diff –git a/Dockerfile b/Dockerfile
index ab01788..723120e 100644
— a/Dockerfile
+++ b/Dockerfile
@@ -128,9 +128,7 @@ ADD ./logstash-beats.crt /etc/pki/tls/certs/logstash-beats.crt ADD ./logstash-beats.key /etc/pki/tls/private/logstash-beats.key # filters
-ADD ./02-beats-input.conf /etc/logstash/conf.d/02-beats-input.conf
-ADD ./10-syslog.conf /etc/logstash/conf.d/10-syslog.conf
-ADD ./11-nginx.conf /etc/logstash/conf.d/11-nginx.conf
+ADD ./02-tcp-input.conf /etc/logstash/conf.d/02-tcp-input.conf ADD ./30-output.conf /etc/logstash/conf.d/30-output.conf # patterns
То есть мы уберем из образа стандартные input, предназначенные для работы с filebeats, syslog и nginx и добавим туда свои файлы конфигурации
Дальше осталось только собрать новый образ:
docker build -t https://docker-registry-host.lan:5000/elk .
В данном случае я его еще и опубликовал в локальном docker-registry (или можно опубликовать на docker hub)
Запускаем ELK
Запуск происходит стандартно, но сначала создадим директорию на host-машине, где мы будем хранить данные Elasticseach, чтобы они не пропали после остановки контейнера
mkdir -p /mnt/data1/elk/data
И запускаем ELK:
sysctl vm.max_map_count=524288 #Необходимо для корректной работы индексов Elasticseach docker run -v /mnt/data1/elk/data:/var/lib/elasticsearch –network=host -p 5601:5601 -p 9200:9200 -p 5044:5044 -e ES_HEAP_SIZE=”4g” -e LS_HEAP_SIZE=”1g” -it -d –name elk docker-registry-host.lan:5000/elk
Обратите внимание на -e ES_HEAP_SIZE=”4g” -e LS_HEAP_SIZE=”1g”, — размер памяти, который Вам необходим зависит от количества логов, которые вы собираетесь агрегировать.
В моём случае 256 Мб, установленных по умолчанию мне не хватило, поэтому я выделил 4 Гб для Elasticsearch и 1 Гб для Logstash соответственно.
Эти параметры придётся подбирать интуитивно исходя из нагрузки, так как внятного описания соответствия объема данных в секунду и количества используемой памяти я не нашёл
Примерно через 40 секунд контейнер запустится и вы сможете зайти в Kibana по адресу host01.lan:5601/app/kibana# и увидите что-то вроде этого:
Так как в файле конфигурации индексов Elasticsearch мы указали формат storm-%{+YYYY.MM.dd}, то при старте Kibana мы зададим index pattern как storm-*
Установка и настройка Apache Storm (факультативно)
По части установки Storm написано множество руководств, да и официальная документация достаточно подробная. Эта часть факультативная и если Вам не интересна настройка Storm, вы можете смело перейти к следующей части
Мы используем ветку Storm 1.0 (по историческим причинам и потому что всем лень портировать код на 1.1.х, так как он просто работает), поэтому я буду устанавливать последнюю версию из этой ветки — 1.0.5 (на момент написания статьи)
Установка довольно проста:
mkdir /opt/storm
cd /opt/storm
wget http://ftp.byfly.by/pub/apache.org/storm/apache-storm-1.0.5/apache-storm-1.0.5.tar.gz
tar xzf apache-storm-1.0.5.tar.gz
ln -s apache-storm-1.0.5 current
Так же для работы кворума нам будут необходимы Zookeeper-сервера. Их настройка — тема для отдельной статьи, так что здесь я их описывать не буду, просто предположу, что они у нас настроены на серверах с именами zookeeper-{01..03}.lan
Создаем конфигурационный файл storm.yaml
— /opt/storm/current/conf/storm.yaml
storm.zookeeper.servers: – “zookeeper-01.lan” – “zookeeper-01.lan” – “zookeeper-01.lan” storm.local.dir: “/opt/storm” nimbus.seeds: [“storm01.lan”, “storm02.lan”]
Здесь помимо Zookeeper-кластера нужно указать Nimbus сервера, которые выступают своеобразными координаторами топологий в Storm
Управление запуском Apache Storm через Supervisord
По умолчанию Apache Storm не демонизируется самостоятельно, а официальное руководство ничего не говорит по поводу автоматического запуска в режиме демона. Поэтому мы используем Python supervisord, хотя конечно же вы можете использовать любой оркестратор процессов (RunIT, daemonize etc)
У меня на CentOS 7.3 supervisord ставится через pip, но зависимость meld3 придется поставить из пакета. На вашей системе установка может (и будет) отличаться, но только в незначительных деталях:
yum install python-pip -y #устанавливаем pip
yum install python-meld3 -y #так же поставим зависимость, необходимую для работы supervisord (pip не может поставить её автоматически на CentOS 7.3)
pip install –upgrade pip #обновим pip до последней версии
pip install supervisor #установим supervisord
Дальше нам необходимо создать конфигурационные файлы для запуска Apache Storm и тут надо остановиться на том, что Storm имеет в своём составе несколько компонентов:
- Nimbus — оркестратор, который предоставляет API, а так же управляет балансировкой задач (топологий, экзекуторов) между узлами кластера
- UI — тут всё просто — это web-интерфейс, который позволяет посмотреть всякое о текущем статусе
- Supervisor — не тот, что мы только что поставили, а свой, внутренний — который получает задания от Nimbus сервера и запускает внутри себя worker'ы, которые и делают работу,описанную в топологиях
- Logviewer — позволяет через web-интерфейс посмотреть логи на каждой машине кластера
Для каждого из них нам нужно будет создать файл конфигурации в /etc/supervisord/conf.d/ в зависимости от роли сервера
Например у нас будет 5 серверов Storm:
- storm01.lan — Nimbus (см. выше, где мы настраивали storm.yaml), UI, Supervisor
- storm02.lan — Nimbus, Supervisor
- storm03.lan — Supervisor
- storm04.lan — Supervisor
- storm05.lan — Supervisor
А так же на каждом сервере мы запустим процесс logviewer (хотя он нам не так уж и нужен, потому что мы сможем смотреть логи из Kibana, но чтобы ссылки в Storm UI не вели в пустоту — пусть будет).
Соответственно на всех пяти серверах создаем вот такие два файла:
[root@storm01 ~]# cat /etc/supervisord/conf.d/storm.supervisor.conf
[program:storm.supervisor]
command=/opt/storm/current/bin/storm supervisor
user=storm
autostart=true
autorestart=true
startsecs=10
startretries=999
log_stdout=true
log_stderr=true
logfile=/opt/storm/supervisor.log
logfile_maxbytes=20MB
logfile_backups=10
environment=JAVA_HOME=/usr/java/current,PATH=%(ENV_PATH)s:/opt/storm/current/bin,STORM_HOME=/opt/storm/current [root@storm01 ~]# cat /etc/supervisord/conf.d/storm.logviewer.conf
[program:storm.logviewer]
command=/opt/storm/current/bin/storm logviewer
user=storm
autostart=true
autorestart=true
startsecs=10
startretries=999
log_stdout=true
log_stderr=true
logfile=/opt/storm/logviewer.log
logfile_maxbytes=20MB
logfile_backups=10
environment=JAVA_HOME=/usr/java/current,PATH=%(ENV_PATH)s:/opt/storm/current/bin,STORM_HOME=/opt/storm/current
Дальше на серверах storm01.lan и storm02.lan создадим аналогичные файлы для запуска Nimbus:
[root@storm01 ~]# cat /etc/supervisord/conf.d/storm.nimbus.conf
[program:storm.nimbus]
command=/opt/storm/current/bin/storm nimbus
user=storm
autostart=true
autorestart=true
startsecs=10
startretries=999
log_stdout=true
log_stderr=true
logfile=/opt/storm/nimbus.log
logfile_maxbytes=20MB
logfile_backups=10
environment=JAVA_HOME=/usr/java/current,PATH=%(ENV_PATH)s:/opt/storm/current/bin,STORM_HOME=/opt/storm/current
Ну и на первом сервере, где мы решили установить UI создадим еще один файл, который будет его запускать:
[root@storm01 ~]# cat /etc/supervisord/conf.d/storm.ui.conf
[program:storm.ui]
command=/opt/storm/current/bin/storm ui
user=storm
autostart=true
autorestart=true
startsecs=10
startretries=999
log_stdout=true
log_stderr=true
logfile=/opt/storm/ui.log
logfile_maxbytes=20MB
logfile_backups=10
environment=JAVA_HOME=/usr/java/current,PATH=%(ENV_PATH)s:/opt/storm/current/bin,STORM_HOME=/opt/storm/current
Как вы могли заметить, файлы конфигурации практически аналогичны, так как Storm использует общую для всех компонентов конфигурацию и мы меняем только роль, которую мы хотим запустить.
На этом настройка Apache Storm под управлением supervisord завершена, осталось только настроить сбор логов.
Настройка Log4J2 для отправки логов в ELK
Для Apache Storm в нашей инсталляции логированием будут управлять два файла:
- /opt/storm/current/log4j2/cluster.xml — управляет конфигурацией для логов сервисов Apache Storm (Nimbus, Supervisor, UI)
- /opt/storm/current/log4j2/worker.xml — управляет конфигурацией для логирования worker'ов, то есть непосредственно топологии (приложения), запущенной внутри Storm
Однако, так как формат Log4J2 универсальный, вы с легкостью можете адаптировать эту конфигурацию к любому Java-приложению
Файл worker.xml:
logdate=(%d{ISO8601}) thread=(%thread)) level=(%level) loggerclass=(%logger{36}) message=(%msg)%n
${defaultpattern} ${defaultpattern}
И файл cluster.xml:
logdate=(%d{ISO8601}) thread=(%thread)) level=(%level) loggerclass=(%logger{36}) message=(%msg)%n
${defaultpattern}
Как вы можете заметить, конфигурация аналогичная, за исключением дополнительного логгера METRICS, который используется для worker'ов (если вы используете метрики в вашей Storm-топологии).
Рассмотрим ключевые моменты в файлах конфигурации:
- Паттерн, который мы используем для логирования, где мы пишем в формате key-value (помните, мы использовали фильтр kv в Logstash) необходимые нам сущности, а именно — дату, тред, уровень логирования, класс (который также станет tag'ом в Elasticsearch) и собственно сообщение, которое было отправлено этим классом:logdate=(%d{ISO8601}) thread=(%thread)) level=(%level) loggerclass=(%logger{36}) message=(%msg)%n
- Помимо логирования на диск (которое необходимо, чтобы смотреть логи через встроенный в Apache Storm logviewer), за которое отвечает дефолтный appender A1 мы используем SocketAppender, который позволит отправлять сообщения непосредственно в Logstash по TCP:
Здесь в после host, мы указываем сервер (хост-машину), на котором у нас запущен docker-контейнер с ELK и порт, который мы указали в конфигурации
- Так же мы обязательно делаем запись логов асинхронной, иначе наша Storm-топология будет вставать колом будет заблокирована, в случае, если Logstash перестанет отвечать или будут проблемы со связностью с этой машиной:
Размер буфера здесь взят наугад, но для моего throughput его более чем достаточно
Запуск Apache Storm и проверка логирования
На этом, собственно настройка закончена, можно запускать Storm и смотреть логи
На каждом сервере выполняем такие команды:
systemctl enable supervisord
systemctl start supervisord
Дальше supervisord запустит все компоненты Apache Storm
Проверка работы и небольшой бонус!
Теперь мы можем зайти в Kibana и полюбоваться на графики вроде такого:
Здесь мы видим распределение сообщений с уровнем INFO по серверам
Интеграция с Grafana
В моём случае, как основная система мониторинга, которая рисует красивые графики и дашборды используется Grafana, и у неё есть прекрасная особенность — она умеет строить графики из Elasticsearch (а еще они на мой взгляд более красивые, чем в Kibana)
Просто зайдем в источники данных в Grafana и добавим наш Elasticsearch, указав адрес host-машины, где у нас запущен ELK:
После чего мы сможем добавить график, где будем смотреть, например количество WARNING по каждому серверу:
Очистка старых логов
Диски, как известно не резиновые, а Elasticsearch по умолчанию никакой ротации не делает. На моей инсталляции это может стать проблемой, так как за день у меня набирается порядка 60 Гб данных в индексах
Для того, чтобы автоматически очищать старые логи, существует python-пакет elasticsearch-curator
Установим его на хост-машине, где у нас запущен elk-контейнер, используя pip:
[root@host01 ~]# pip install elasticsearch-curator
И создадим два конфигурационных файла, один описывает подключение к Elasticsearch, а другой задает action, т.е. действия непосредственно для очистки устаревших индексов:
Источник: http://www.pvsm.ru/sistemnoe-administrirovanie/268758
elasticsearch-curator
Have indices in Elasticsearch? This is the tool for you!
Like a museum curator manages the exhibits and collections on display, Elasticsearch Curator helps you curate, or manage your indices.
| 3 | yes | yes* | yes | yes* | no | no | no |
| 4 | no | no | yes | no | yes | no | no |
| 5 | no | no | no | no | yes | yes* | no |
| 5.4+ | no | no | no | no | yes | yes* | yes |
It is important to note that Curator 4 will not work with indices created in versions of Elasticsearch older than 1.4 (if they have been subsequently re-indexed, they will work). This is because those older indices lack index metadata that Curator 4 requires. Curator 4 will simply exclude any such indices from being acted on, and you will get a warning message like the following:
2016-07-31 10:36:17,423 WARNING Index: YOUR_INDEX_NAME has no
“creation_date”! This implies that the index predates Elasticsearch v1.4.
For safety, this index will be removed from the actionable list.
It is also important to note that Curator 4 requires access to the /_cluster/state/metadata endpoint. Forks of Elasticsearch which do not support this endpoint (such as AWS ES, see #717) will not be able to use Curator version 4.
* It appears that AWS ES does not allow access to the snapshot status endpoint for the 1.x, 2.x, 5.1, and 5.3 versions. This prevents Curator 3 from being used to make snapshots.
? Curator 4 and 5 should work with AWS ES 5.x, but the /_cluster/state/metadata endpoint is still not fully supported (see #880). If a future patch fixes this, then Curator 4 and 5 should work with AWS ES 5.x.
| Master |
| 5.x |
| 5.1 |
| 5.0 |
| 4.x |
| 4.3 |
PyPI:<\p>
Version 5 of Curator ships with both an API and a wrapper script (which is actually defined as an entry point). The API allows you to write your own scripts to accomplish similar goals, or even new and different things with the Curator API, and the Elasticsearch Python API.
Encountering issues like DistributionNotFound? See the FAQ for that issue, and more.
- fork the repo
- make changes in your fork
- add tests to cover your changes (if necessary)
- run tests
- sign the CLA
- send a pull request!
To run from source, use the run_curator.py script in the root directory of the project.
To run the test suite just run python setup.py test
When changing code, contributing new code or fixing a bug please make sure you include tests in your PR (or mark it as without tests so that someone else can pick it up to add the tests). When fixing a bug please make sure the test actually tests the bug – it should fail without the code changes and pass after they’re applied (it can still be one commit of course).
The tests will try to connect to your local elasticsearch instance and run integration tests against it. This will delete all the data stored there! You can use the env variable TEST_ES_SERVER to point to a different instance (for example, ‘otherhost:9203’).
The combination of setuptools and cx_Freeze allows for Curator to be compiled into binary packages. These consist of a binary file placed in a directory which contains all the libraries required to run it.
In order to make a binary package you must manually install the cx_freeze python module. You can do this via pip, or python setup.py install, or by package, if such exists for your platform.
In order to make it compile on recent Debian/Ubuntu platforms, a patch had to be applied to the setup.py file in the extracted folder.
This patch file is in the unix_packages directory in this repository.
With cx_freeze installed, building a binary package is as simple as running python setup.py build_exe. In Linux distributions, the results will be in the build directory, in a subdirectory labelled exe.linux-x86_64-${PYVER}, where ${PYVER} is the current major/minor version of Python, e.g. 2.7. This directory can be renamed as desired.
Other entry-points that are defined in the setup.py file, such as es_repo_mgr, will also appear in this directory.
The process is identical for building the binary package for Windows. It must be run from a Windows machine with all dependencies installed. Executables in Windows will have the .exe suffix attached. The directory in build will be named exe.win-amd64-${PYVER}, where ${PYVER} is the current major/minor version of Python, e.g. 2.7. This directory can be renamed as desired.
In Windows, cx_Freeze also allows for building rudimentary MSI installers. This can be done by invoking python setup.py bdist_msi. The MSI fill will be in the dist directory, and will be named elasticsearch-curator-#.#.#-amd64.
msi, where the major, minor, and patch version numbers are substituted accordingly. One drawback to this rudimentary MSI is that it does not allow updates to be installed on top of the existing installation.
You must uninstall the old version before installing the newer one.
The unix_packages directory contains the build_packages.sh script used to generate the packages for the Curator YUM and APT repositories. The Vagrant directory has the Vagrantfiles used in conjunction with the build_packages.sh script. If you wish to use this method on your own, you must ensure that the shared folders exist.
/curator_packages is where the packages will be placed after building. /curator_source is the path to the Curator source code, so that the build_packages.sh script can be called from there. The build_packages.sh script does not use the local source code, but rather pulls the version specified as an argument directly from GitHub.
Version 5 of Curator is the current master branch. It supports only 5.x versions of Elasticsearch.
Источник: https://pypi.org/project/elasticsearch-curator/
How to setup an Elasticsearch cluster with Logstash on Ubuntu 12.04
Hey there !
I’ve recently hit the limitations of a one node elasticsearch cluster in my ELK setup, see my previous blog post: Centralized logging with an ELK stack (Elasticsearch-Logback-Kibana) on Ubuntu
After more researchs, I’ve decided to upgrade the stack architecture and more precisely the elasticsearch cluster and the logstash integration with the cluster.
I’ve been using the following software versions:
- Elasticsearch 1.4.1
- Logstash 1.4.2
Setup the Elasticsearch cluster
You’ll need to apply this procedure on each elasticsearch node.
Java
I’ve decided to install the Oracle JDK in replacement of the OpenJDK using the following PPA:
$ sudo add-apt-repository ppa:webupd8team/java $ sudo apt-get update && sudo apt-get install oracle-java7-installer
In case you’re missing the add-apt-repository command, make sure you have the package python-software-properties installed:
$ sudo apt-get install python-software-properties
Install via Elasticsearch repository
$ wget -O – http://packages.elasticsearch.org/GPG-KEY-elasticsearch | sudo apt-key add – $ echo “deb http://packages.elasticsearch.org/elasticsearch/1.
4/debian stable main” | sudo tee -a /etc/apt/sources.list.d/elasticsearch.
list $ sudo apt-get update && sudo apt-get install elasticsearch
You can also decide to start the elasticsearch service on boot using the following command:
$ sudo update-rc.d elasticsearch defaults 95 10
Configuration
You’ll need to edit the elasticsearch configuration file in /etc/elasticsearch/elasticsearch.yml and update the following parameters:
- cluster.name: my-cluster-name
I suggest to update the default cluster name with a defined cluster name. Especially if you want to have another cluster on your network with multicast enabled.
- index.number_of_replicas: 2
This will ensure a copy of your data on every node of your cluster. Set this property to N-1 where N is the number of nodes in your cluster.
- gateway.recover_after_nodes: 2
This will ensure the recovery process will start after at least 2 nodes in the cluster have been started.
- discovery.zen.mininum_master_nodes: 2
Источник: https://deviantony.wordpress.com/2014/09/23/how-to-setup-an-elasticsearch-cluster-with-logstash-on-ubuntu-12-04/
Собираем и анализируем логи с помощью Lumberjack+Logstash+Elasticsearch+RabbitMQ
3 апреля 2014 в 10:13 (МСК) | сохранено4 апреля 2014 в 10:13 (МСК)<\p>
Добрый день. Логи часто и абсолютно не заслуженно обделены вниманием разработчиков.
И когда программистам необходимо пропарсить log-файлы, иногда с нескольких десятков серверов одновременно, задача эта ложится на системных администраторов и отнимает у них много времени и сил.
Поэтому, когда случаются проблемы и надо найти ошибку в логах какого-нибудь сервиса, все зависит от того, насколько силен админ и насколько программисты знают, что искать. А еще от того, отработал ли logrotate и не грохнул ли он старые данные…
В таких ситуациях отлично помогает Logstash. Он активно развивается последний год, уже наделал много шуму, и на хабре, например тут и тут, достаточно статей о том, как его поставить и заставить работать на одном сервере. В этой статье я затрону Logstash в качестве сервера обработки, потому что, как агент, он по некоторым параметрам нам не подошел.
Почему? Maxifier представляет собой SaaS-продукт с клиентами в США, Бразилии, в нескольких странах Европы и в Японии, так что у нас около сотни серверов, раскиданных по всему миру.
Для оперативной работы нам необходимо иметь удобный доступ к логам наших приложений и быстрый поиск ошибок в них в случае проблем на сторонних сервисах/api, появления некорректных данных т.д.
Кстати, похожей системой сборки логов пользуются The Guardian (одни из наших клиентов).
После нескольких случаев сборки логов Rsync-ом со множества серверов мы задумались над альтернативой, менее долгой и трудоемкой. И недавно мы разработали свою систему сборки логов для разных приложений. Поделюсь собственным опытом и описанием, как это работает.
Наши целевые приложения, с которых собираем логи: 1.
Демоны на Java (Jetty/Native) 2. Демоны на Node.js 3. Динамически запускаемые Java-приложения (например, узлы кластера) Критичными для программистов являются ошибки и исключения с многострочными стектрейсами, пролетающими при таких ошибках. Поэтому главными требованиями были: 1. Хорошая поддержка мультистрочных сообщений. 2.
Возможность обработки разного формата сообщений. 3. Легкое конфигурирование источников данных. Не вдаваясь глубоко в часть конфигурирования, расскажу про составные части и почему они присутсвуют в схеме.
В целом наша схема сбора логов выглядит вот так:На схеме видно, что мы не держим logstash, который мониторил бы файлы приложений на серверах приложений.
Мы посчитали, что неэффективно использовать демона, который во время записи логов потребляет 128 мб памяти и значительную часть мощностей процессора, а насильное ограничение ресурсов тут выглядело бы, как костыль. Поэтому мы стали искать другие, менее требовательные решения для проблемы транспортировки логов.
Агенты
Rsyslog — уже готовый демон логирования и умеет, казалось бы, все, но дело всегда в мелочах.
Преимущества:
1. Быстр. 2. Умеет отслеживать файлы.
3. Умеет копать и не копать шифровать и не шифровать.
4. Уже есть в системе.
Недостатки:
1. Не умеет пересылать мультистрочные сообщения (Все попытки на сервере получить мультистрочное сообщение целиком оказались тщетны). 2. Не умеет отслеживать файлы по маске. 3. Плохо обрабатывает file truncation. Как уже говорилось, нам была важна поддержка мультистрочных сообщений, поэтому мы продолжили поиски, но временно подключили сборку логов Rsyslog, чтобы потом организовать поиск по ним.
Lumberjack (ныне известный как logstash-forwarder) — экспериментальный демон для пересылки логов.
Преимущества:
1. Быстр. 2. Минималистичен (Unix-way). 3.Умеет использовать маски. 4. Потребляет минимум ресурсов (написан на Go).
Недостатки:
1. Экспериментальный. 2. Самостоятельно не поддерживает мультистрочные сообщения.
Logstash (только как агент)
Преимущества:
1. Один и тот же софт для сбора логов везде. 2. Достаточно производительный. 3. Умеет все, что нам нужно.
Недостатки:
1. Java на всех серверах. 2. Высокие требования к памяти, потенциально может влиять на работу других сервисов. 3. Сложный в настройке. Мы решили протестировать Lumberjack, а если результат не устроит, откатиться на вариант с Logstash на каждом сервере.
Так как Logstash и Lumberjack разрабатывали одни и те же люди, то в придачу мы получили приятные плюшки: например, дополнительные поля — с ними мы смогли узнавать тип приложения логов без парсинга имен файлов.
Источник: https://sohabr.net/post/216201/